
Refinishing your wood floors will guarantee they hold up against the test of time, protecting them from any wear and tear your family throws at them. If you’ve been putting this project off due to the price, you must understand that renovating your floorings doesn’t need to cost you a fortune.Sanding and refinishing your wood floors as a DIY project is a time financial investment, but it is cheaper than paying a professional. Refinishing your floors yourself can cost between$500 and$1,000 depending upon square footage. You can anticipate to pay an expert $3 to $4 per square foot to finish the same job.”Our home is 1,200 square feet and it’s practically all hardwood … the quote we got was around$4,000 and we invested$600 doing the task ourselves, so we wound up conserving$3,400.”Sarah Gibson|Designer & Blogger, Space for Tuesday Pro Tip: When refinishing your wood floors, you might desire
to consider staying elsewhere. This job can take more than three or four days. Throughout some phases of the task, you will not be able to step on the floor for at least 24 hours.How to Tell if Your Hardwood Flooring Should Be Refinished Before you begin, determine what kind of floor covering you have and what state it is in.To determine what type of wood flooring you have:
Get rid of a floor air vent and take a look at the ends of the flooring.If you see solid wood a minimum of 3/4 of an inch thick, you ready to move forward.If you see individual layers of thin wood,
know exactly ways to work the machine prior to taking it out of the store.You will likewise require the right size of sandpaper and pads for each machine. What grit of sandpaper should you use to sand your wood floorings? You will require 3 various levels of sandpaper to finish this project.You will use a various grit for each pass over the floor. Depending on the state of
grit sandpaper for your first pass.50 to 60 grit sandpaper for your second pass.80 to 100 grit sandpaper for your 3rd pass.Additional Products Needed for Refinishing Wood Floors: To use: Dust mask Goggles Earplugs To prep the room: Plastic sheeting Painters tape Wood flooring cleaner Putty knife Cotton rags Wood filler Nail set Store vacuum Mineral spirits Sanding screen, 120 grit To use finish: Polyurethane flooring surface Paintbrush
Lamb’s-wool applicator Paint tray If you are staining the flooring you will likewise need: Preparation Your House Before you’re prepared to
- refinish your hardwood floorings, you need to empty the room
- and thoroughly clean the floors.Follow these actions to prepare your home: Start by clearing the room of furnishings
, curtains and decorations.Remove doors and shoe molding. Eliminating molding is optional, but it will help avoid damage. If you pick to remove it, utilize tape to number
the pieces and the collaborating wall so you understand where each piece belongs.Inspect the floor for any nails that are not flush with the flooring . Utilize the nail set, a small metal tool used for driving nails below the surface area of hardwood, to make sure no nail heads are sticking up . Nails not flush with the floor will tear the sandpaper and slow your progress.Repair any existing damage to the floorings, like holes or scratches, with wood putty and a putty knife.Clean floors with hardwood flooring cleaner.Cover doors, vents, windows and surface areas with plastic sheeting and painters tape. This will prevent dust from traveling throughout your house.”I would likewise advise eliminating all baseboards– this step isn’t really necessary, however it makes the task much simpler.
We’ll be including new molding throughout the house
- , so it completely made good sense to trash the existing baseboards prior to the flooring
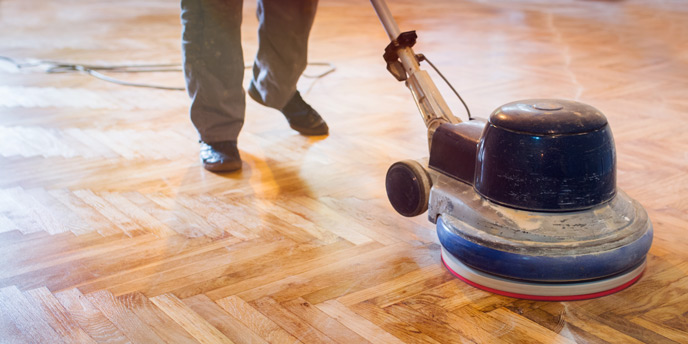
- task.”Sarah Gibson|Designer & Blogger, Space for Tuesday Now you’re all set to begin refinishing your hardwood floorings. Sand and Refinish Your Wood Floors Prepare your sander by connecting the coarsest grit of sandpaper. Position your sander to choose the grain of the wood. If your flooring is warped, go diagonal with the grain, but never go completely against the wood grain. As soon as you’re prepared, follow these steps to sand your wood floors.Pro pointer: Use a face mask and goggles to protect yourself from the dust and earplugs to safeguard your hearing.Steps to Sand Your Hardwood Floors: Begin moving the device forward as you turn it on. If you remain in one place for too long, you will harm the floor.Move at a consistent, even rate
and let the maker do the work as you follow the grain across the space. Do not press the sander.When you get to the other side of the space, move over and draw back somewhat overlapping the next pass a couple of inches with the previous one, about one floorboard’s width. You do
n’t have to turn the maker around as & it can move in both directions
with the exact same effect.Check the sandpaper often to make sure it isn’t worn.
Change it as it does break, utilizing the same grit
of sandpaper till you have actually covered the entire room when. If the sander has a dust collecting bag, empty it typically so it does not add weight to the machine.Cover the whole room, getting within a couple of inches of the walls and corners. After completing one trip around the entire space, switch off the device
prior to you stop moving.Apply the very same grit of sandpaper to the hand sander. Use it to complete the edges of the space. Move in a semicircular movement, overlapping the completed area
- to help it mix in.Use the vacuum to clean the floor prior to starting the second round of sanding.Repeat all actions twice more, altering the grit of
- the sandpaper each time. Utilize the 50 to 60-grit for the 2nd pass and the 80 to 100-grit for the 3rd pass.After these steps, the flooring must
- look like smooth, without treatment wood. If the floor still feels rough or lines from the sander are still visible, buff it using the sanding screen. This ought to remove any visible great scratches left by the sander.After the entire flooring feels smooth, tidy the space again. This time use the vacuum and
- a wet mop to ensure no dust is left behind.Use a clean cotton rag to clean the flooring with mineral spirits to get rid of any trace of chemicals from the wood. Then, leave it to dry.Stain Your Hardwood Floor to Modification the Color Staining is an optional action.
- If you’re trying to find a fashionable dark flooring, stain is the way to go. If you wish to stick with the natural color of the wood, skip this step and proceed to the
- polyurethane finish. Staining your floor will add at least one whole day to your project time.After selecting a color, try it out on a piece of scrap wood to guarantee you like it.
- Then, follow the directions on the can.Tips for Staining Your Wood
- Floor: Apply stain with a paintbrush or fabric, choosing the grain of the wood.Remove any excess stain with a rag before moving on.Stir your stain every 10 to 15 minutes.Let dry in between coats and
apply as many coats as required to attain perfect color. “We started in the corner of each room and worked our way toward the door. After a section is complete, it’s very essential to clean and soak up all excess stain with a clean application pad! I cleaned the floor 5 planks at a time. Do not be tricked by the roller applicator at the home enhancement shop.
We attempted using it for one room and it did not work out. You can manage the staining process a lot easier when done by hand! It’s neater, more
even, and takes less time to dry.”Sarah Gibson|Designer & Blog Writer, Room for Tuesday Pro suggestion: Do not wear shoes on a just recently stained floor.Apply Finishing Coats to Wood Floors This is the final and crucial step when refinishing your hardwood floorings. This covering seals your floors and protects them from future damage. If you stained your floorings, wait until
the stain is totally dry. Next, tidy the floorings completely with a vacuum. Any dirt, dust or hair on the floor will become caught under the ending up coat.Polyurethane can be found in both
- water and oil-based types. Oil-based will include a warm golden glow to your floors, however dries slower than the water-based option. Water-based polyurethane will keep
- the natural color of the wood as well as dry quicker. You need to ensure the room is well-ventilated prior to using either one. Wear your facemask during this action as well.Before beginning,
get rid of any extra fuzz from the lamb’s- wool applicator. Run the vacuum over it and then utilize painters tape to get rid of every last piece.Steps for Using Complete to Hardwood Floors Begin using a paintbrush on the boundary of the room. Cover about 12 inches of the flooring from the wall toward the center of the space. Operate in the instructions of the wood grain.Keep your brush wet and try to prevent bubbles and drips.Once the border is complete, use the lamb’s- wool applicator to do the rest of the room.Remember to work your method towards the exit, while still applying with the grain. When you start to apply the polyurethane, you
will not be able to step on the floor.You will want to use a minimum of two coats, more in
highly trafficked areas. Wait 24 hours before
finishing extra coats. Depending upon temperature level and humidity, you may require to wait longer.Some brands of polyurethane will need sanding in between coats, but others will not. Seek advice from the container for directions. If you do sand in between coats, make certain to clean thoroughly to get rid of all the dust.Once you’ve completed the preferred variety of coats, merely wait for them to dry and after that you’re done! You can start strolling on your refinished wood floors 24 Hr after adding the last coat. Wait a week(or as long as possible)before moving furniture back into the room to avoid scratching.Have you refinished hardwood floors prior to? Let us know how it entered the comments!Completing more home improvement tasks? Have a look at our< a href=https://www.budgetdumpster.com/resources/for-home-projects.php >
Home Project Guides to learn the best ways to budget plan for a kitchen area remodel, efficiently declutter your home or get ready for a storm.